Grok Bot is xAI's agent app. According to launch coverage, its agents are always on, each with its own computer in the cloud. If you would rather keep your agents on a server you control, you can do that without paying for the server: Oracle Cloud's Always Free tier includes an Arm server with 2 CPUs and 12 GB of memory, and kwant, the open-source AI agent team we build, runs on it with one Docker command.
This guide goes from a new Oracle account to a Grok-powered bot team you open in your browser. The longest wait is kwant's first build, which took about 20 minutes in our test.
How we checked this guide. The Oracle Cloud steps follow Oracle's own Free Tier tutorial and documentation, linked in each step and read on 2026-11-05. We ran every command from step 5 onwards on 2026-11-05, in a fresh Ubuntu 24.04 container on an Oracle Ampere A1 server, limited to 2 CPUs and 12 GB of memory, the Always Free size. The timings, memory figures and screenshots below come from that run. We started the Grok sign-in and checked what it asks for, but did not finish it with a real xAI account.
What "free" covers
| Part | What it costs |
|---|---|
| The server: Oracle's Always Free Arm instance | Nothing, as long as you stay within the Always Free limits |
| kwant | Nothing. It is open source under AGPL-3.0 |
| Grok, the AI model | Your own xAI account or API key, on xAI's terms and prices |
So the server and the software are free. The model calls are billed by xAI under your own account, the same as when you use Grok anywhere else.
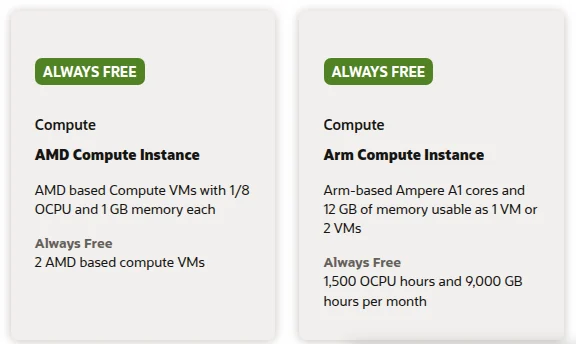
Oracle's Always Free resources page (checked 2026-11-05) spells out the Arm allowance: one VM with 2 OCPUs and 12 GB of memory, or two smaller ones. That is enough for kwant's Docker setup, which needs about 4 GB of free memory (install guide). The free tier also has two tiny AMD servers with 1 GB of memory each. They are too small for kwant, so this guide uses the Arm one.
Before you start
- A credit or debit card for Oracle's identity check. Oracle's Free Tier FAQ (checked 2026-11-05) says the card is for verifying who you are and that you will not be charged; your bank may show a temporary hold that it removes in 3 to 5 days. Oracle does not accept PIN debit cards, virtual cards, single-use cards or prepaid cards.
- A terminal with SSH. macOS and Linux have one built in. On Windows, Oracle's tutorial uses OpenSSH in PowerShell.
- An xAI account to sign in to Grok, or an xAI API key.
Step 1: Create your Oracle Cloud account
Go to oracle.com/cloud/free and choose Start for free. Oracle's sign-up guide (checked 2026-11-05) walks through the form in this order:
- Your country, name and email, then Verify my email. The link Oracle emails you is valid for 30 minutes.
- A password and a cloud account name, which identifies your account.
- Your home region (more on this below).
- Your address and phone number.
- Add payment verification method → Credit Card, then your card details.
- Accept the terms and choose Start my free trial.
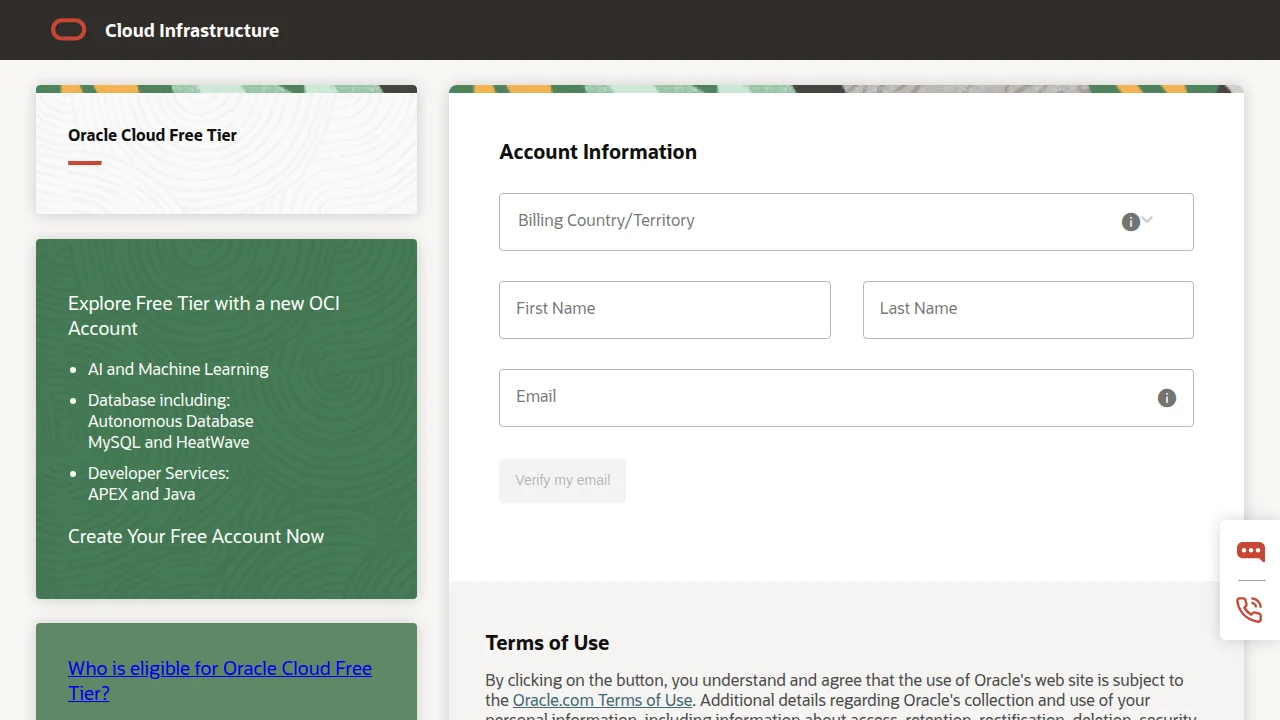
The home region matters more than anything else on the form. It is where your servers live, Oracle's guide says "You can't change this after signing up", and Always Free servers must be created in your home region (Oracle docs, checked 2026-11-05). Pick one close to you.
Three more things from Oracle's Free Tier page, checked 2026-11-05:
- New accounts get US$300 of credit for 30 days in select countries. If you do nothing when the 30 days end, you keep the Always Free services.
- You can have one free account per person.
- Free accounts left idle for more than 30 days may be treated as abandoned.
Step 2: Create a network
Your server needs a network with internet access. Oracle has a wizard for this (Oracle's tutorial, checked 2026-11-05):
- Open the navigation menu and go to Networking → Virtual cloud networks.
- Choose Start VCN Wizard, pick Create VCN with Internet Connectivity, and choose Start VCN Wizard again.
- Give the network a name, keep the defaults, choose Next, then Create.
The wizard creates the network, an internet gateway, and a public and a private subnet. You will use the public subnet in the next step.
Step 3: Create the server
Still in Oracle's tutorial:
- Go to Compute → Instances and choose Create Instance. Give it a name, such as
kwant. - Placement: for the availability domain, pick one marked Always Free Eligible.
- Image and shape: choose Edit. For the image, pick Canonical Ubuntu 24.04: Ubuntu is one of the Always Free images for the Arm shape, and it is what we tested. For the shape, choose Change shape → Virtual Machine → Ampere → VM.Standard.A1.Flex, which Oracle calls "the Always Free shape", and set 2 OCPUs and 12 GB of memory, the whole free allowance.
- Networking: pick the network from step 2 and its public subnet, and set Assign a public IPv4 address to Yes.
- SSH keys: choose Generate a key pair for me, then Save Private Key (and Save Public Key if you like). Do this now: Oracle cannot show you the keys again after the server is created.
- Leave the boot volume as it is. Always Free servers get a 50 GB boot volume automatically.
- Choose Create. Oracle says provisioning takes several minutes, and the system needs a few more minutes to boot once the server shows as running.
If you see "Out of host capacity": Oracle's Always Free page says this means there are no free Arm servers left in your region at the moment. Try another availability domain, or wait and try again later. Oracle also suggests upgrading to Pay As You Go: it says Always Free resources stay free after the upgrade and you pay only for use above the free limits. That is your call; this guide does not need it.
Step 4: Connect with SSH
On the server's page in the console, copy its public IP address. Then, in a terminal on your computer, protect the private key you saved and connect. The user name on Ubuntu servers is ubuntu:
chmod 400 path/to/your-private.key
ssh -i path/to/your-private.key ubuntu@YOUR_SERVER_IP
The first time, SSH asks whether you trust the server's fingerprint. Type yes. Every command from here until step 8 runs on the server.
Step 5: Install Docker
These are the commands from Docker's own Ubuntu install guide (checked 2026-11-05). They add Docker's package repository and install Docker Engine with the Compose plugin:
sudo apt update
sudo apt install -y ca-certificates curl
sudo install -m 0755 -d /etc/apt/keyrings
sudo curl -fsSL https://download.docker.com/linux/ubuntu/gpg -o /etc/apt/keyrings/docker.asc
sudo chmod a+r /etc/apt/keyrings/docker.asc

sudo tee /etc/apt/sources.list.d/docker.sources <<EOF
Types: deb
URIs: https://download.docker.com/linux/ubuntu
Suites: $(. /etc/os-release && echo "${UBUNTU_CODENAME:-$VERSION_CODENAME}")
Components: stable
Architectures: $(dpkg --print-architecture)
Signed-By: /etc/apt/keyrings/docker.asc
EOF

sudo apt update
sudo apt install -y docker-ce docker-ce-cli containerd.io docker-buildx-plugin docker-compose-plugin
In our test, these commands finished in under 30 seconds. Next, let your user run Docker without sudo (Docker's post-install steps), then log out and back in so the change applies:
sudo usermod -aG docker $USER
exit
SSH in again with the same command as in step 4, and check that Docker works:
docker run hello-world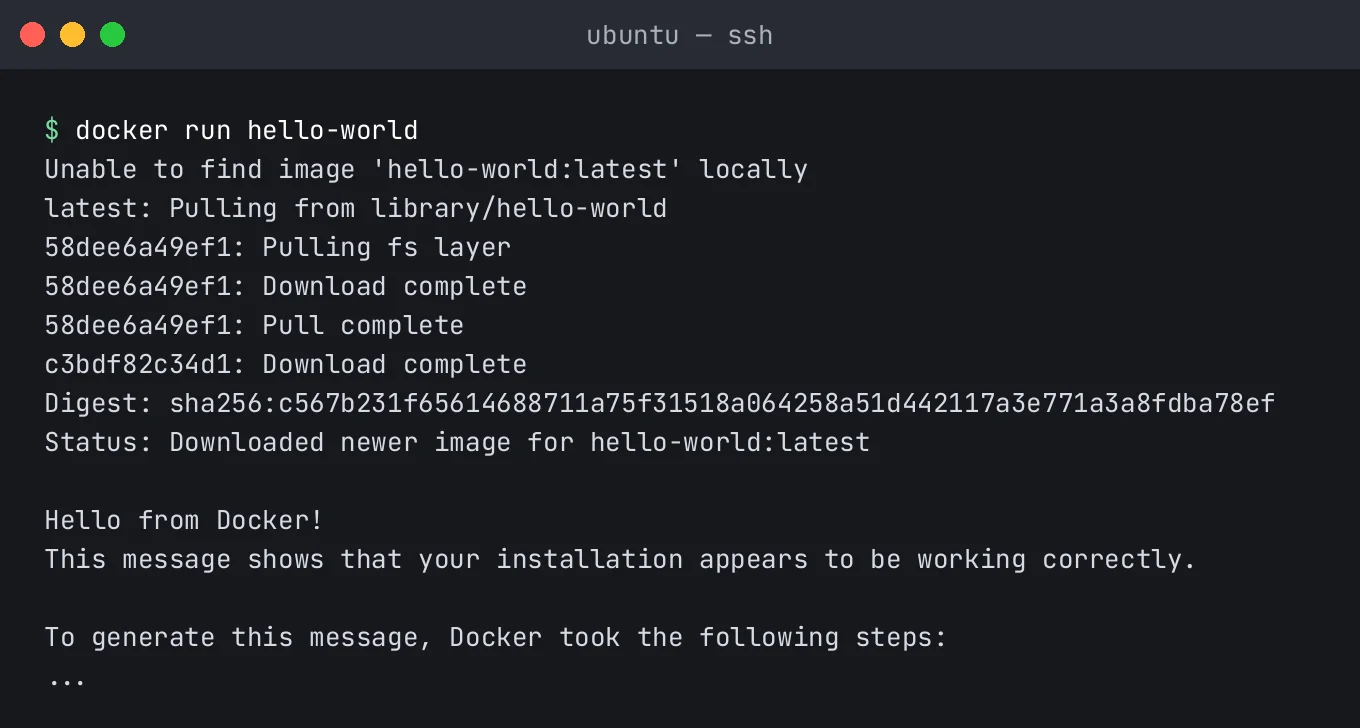
On Ubuntu, Docker starts automatically when the server boots, so you do not need to set that up (Docker docs).
Step 6: Install kwant
Get kwant's code and tell Docker which AI command-line tools to include. Saving the choice in a .env file means every later build picks it up, including updates:
sudo apt install -y git
git clone https://github.com/alexsergivan/kwant.git && cd kwant
echo "KWNT_CLIS=grok" > .env
docker compose up -d --build
git is usually already on Ubuntu servers; the first line just makes sure. To add Claude Code or Codex next to Grok, write KWNT_CLIS=grok,claude,codex instead.
The first build compiles kwant from source, because there is no ready-made Arm desktop app; on Linux, kwant's desktop app is x86_64 only (install guide). In our test on 2 CPUs and 12 GB, with all three tools included, the build took 19 minutes. Later starts take seconds.
When it finishes, check that the three parts are running and that kwant is healthy:
docker compose ps
docker compose exec kwnt kwnt doctor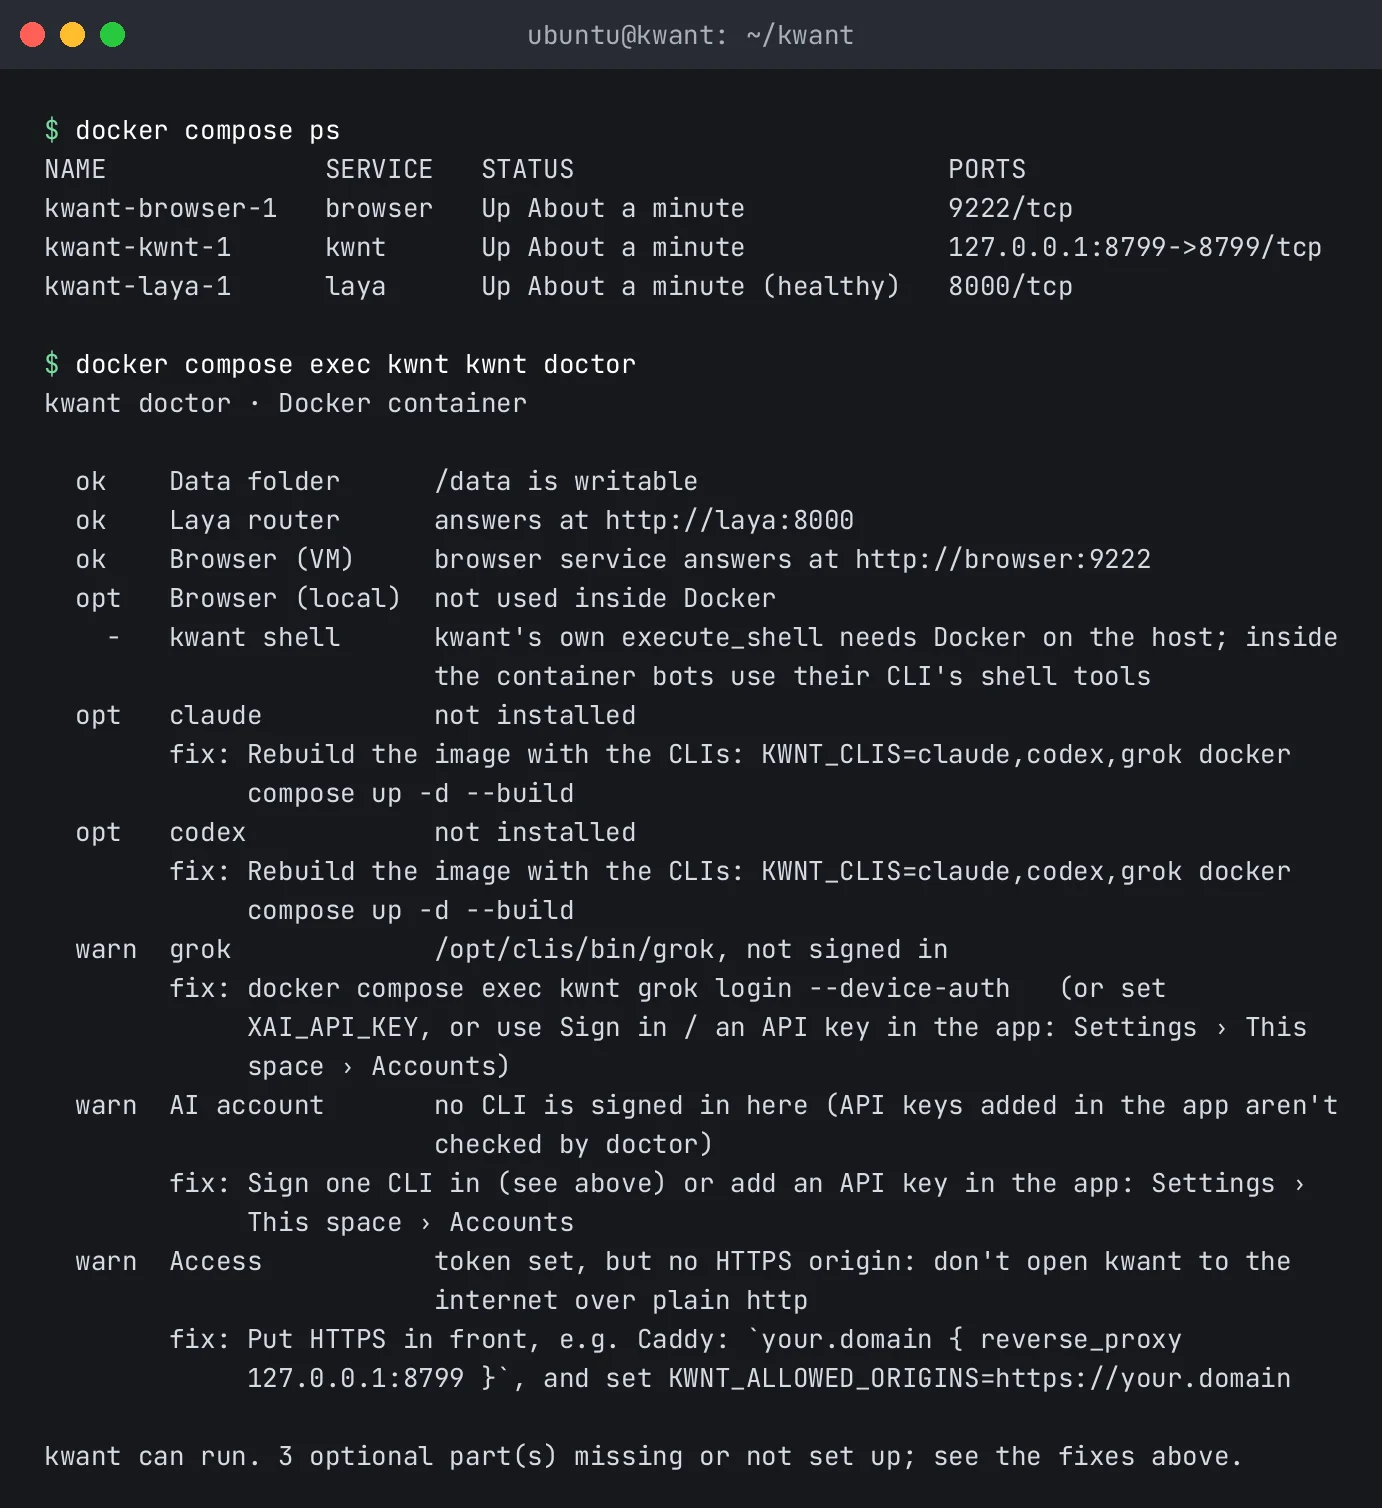
KWNT_CLIS=grok. To fit the page, we left out three of the ps columns (IMAGE, COMMAND, CREATED) and wrapped long lines.The warn lines are expected at this point. Grok is not signed in yet; that is the next step. The Access warning says not to open kwant to the internet over plain HTTP, and this guide doesn't: you reach it through an SSH tunnel in step 8.
Step 7: Sign in to Grok
kwant uses the Grok command-line tool with your own xAI login. Start the sign-in on the server:
docker compose exec kwnt grok login --device-authIt prints a link to accounts.x.ai and a short code, then waits. Open the link in a browser on your computer, check that the code on the page matches the one in your terminal, and approve the sign-in with your xAI account. As the tool itself says, only continue with a code you requested, and don't share it.
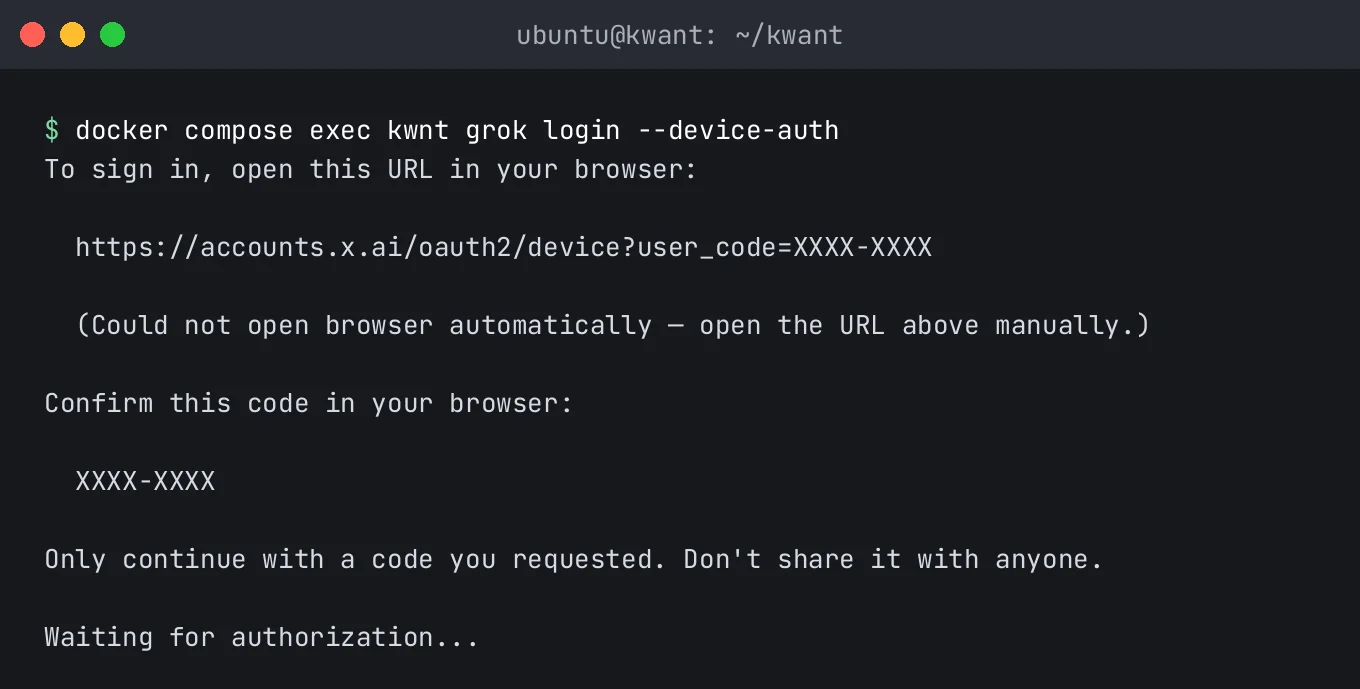
Your Grok sign-in is kept in a Docker volume, so it survives updates and rebuilds.
If you would rather use an xAI API key, skip this step and add the key in the app in step 8, under Settings → This space → Accounts (install guide). Either way, check xAI's current terms and prices for the plan or key you use.
Step 8: Open kwant from your computer
kwant's web app listens only on the server itself (on 127.0.0.1, port 8799), so it is not exposed to the internet. You reach it through an SSH tunnel. On your computer, in a new terminal:
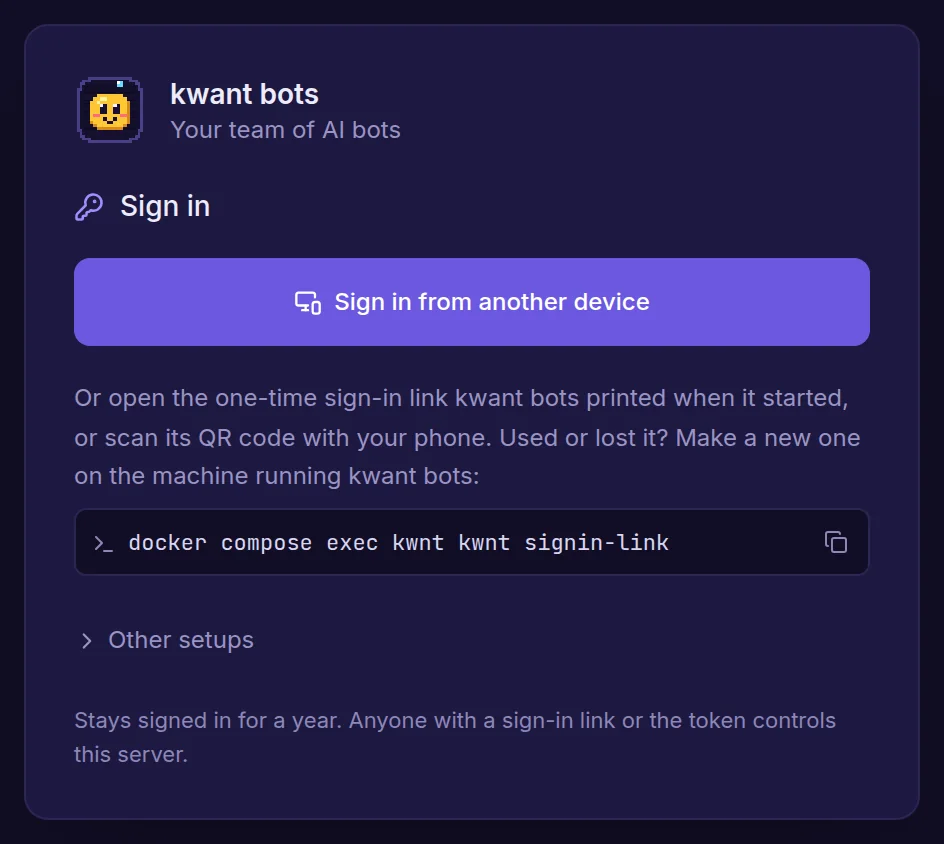
ssh -i path/to/your-private.key -N -L 8799:127.0.0.1:8799 ubuntu@YOUR_SERVER_IPThe command prints nothing and keeps running; leave it open. Now, in your SSH session on the server, ask kwant for a sign-in link:
docker compose exec kwnt kwnt signin-linkIt prints a one-time link that starts with http://<this-host>:8799/#kwnt_token=. Copy it, replace <this-host> with 127.0.0.1 (through the tunnel, that address on your computer reaches kwant on the server), and open it in your browser. The link works once and expires after 15 minutes; if it does, run the command again for a new one. That browser then stays signed in for a year.
If you open http://127.0.0.1:8799 without the link, kwant shows its sign-in screen, which points you to the same command.

To check that kwant can use your Grok sign-in, open Settings → This space → Accounts. It lists each AI tool on the server and whether it is signed in. This is also where you paste an xAI API key instead.
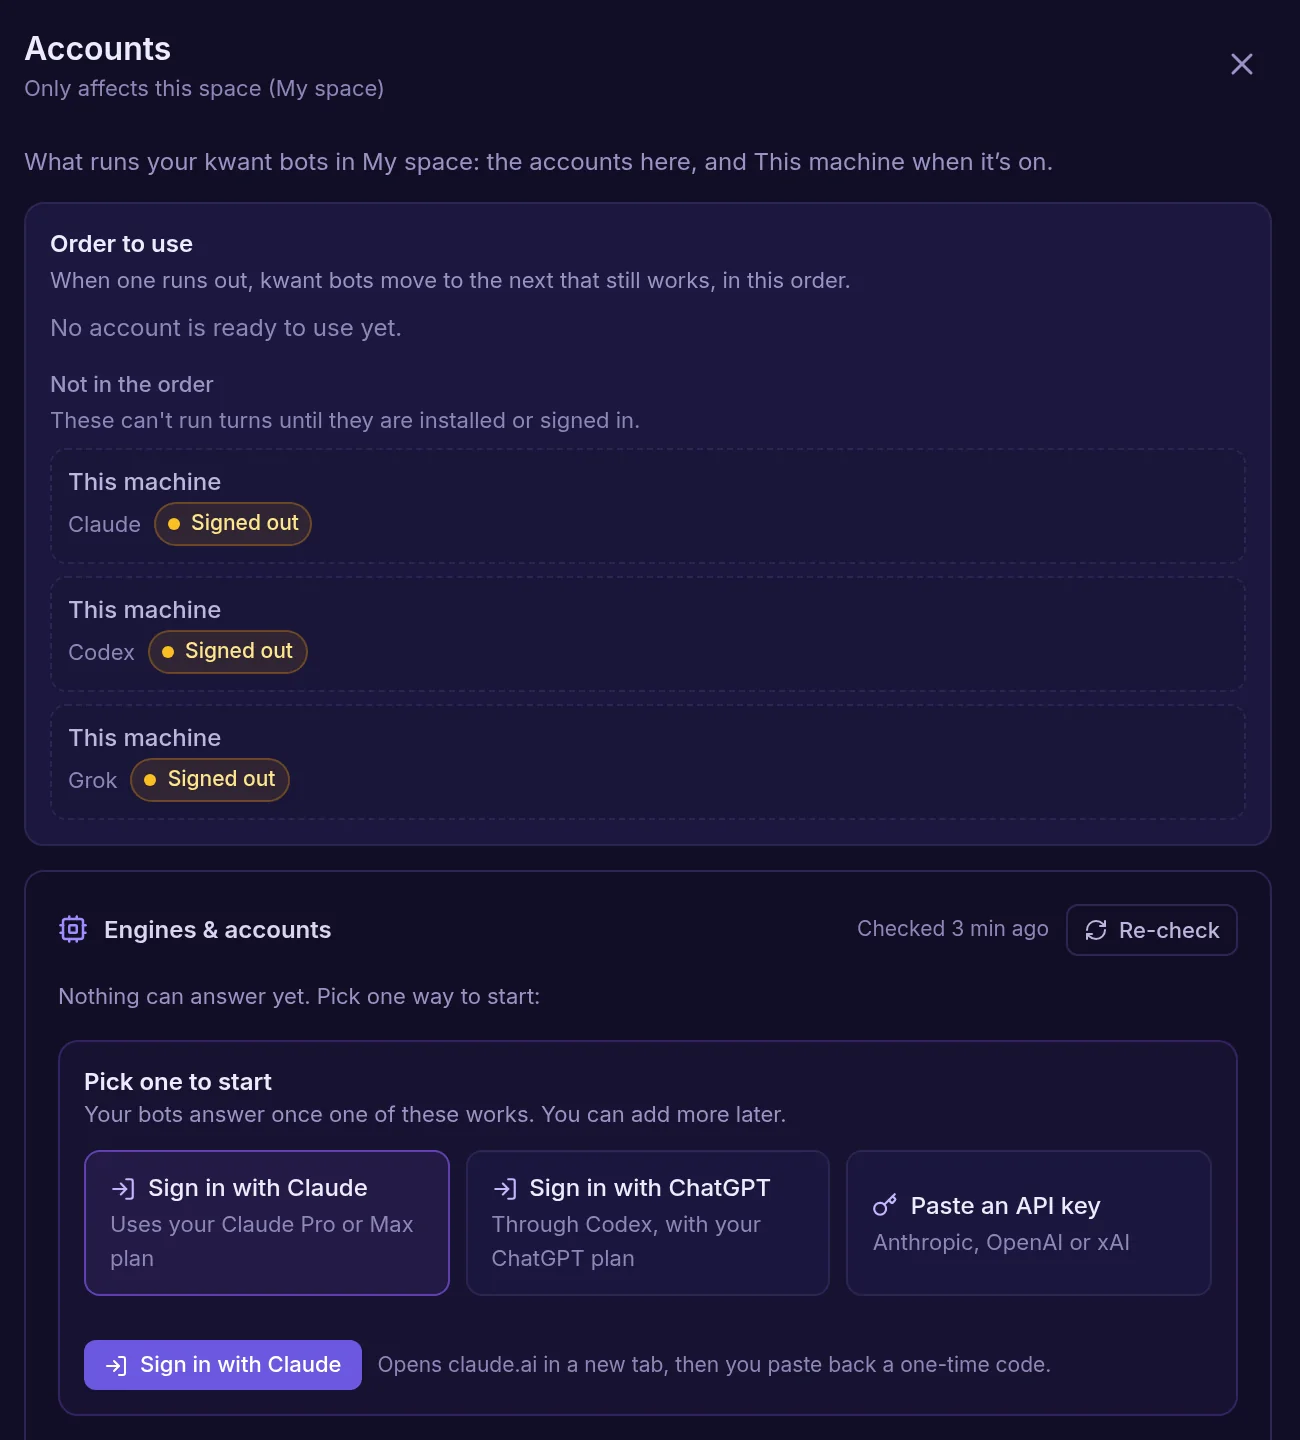
KWNT_CLIS=grok you get Grok only.Step 9: Bring your Grok Bot across
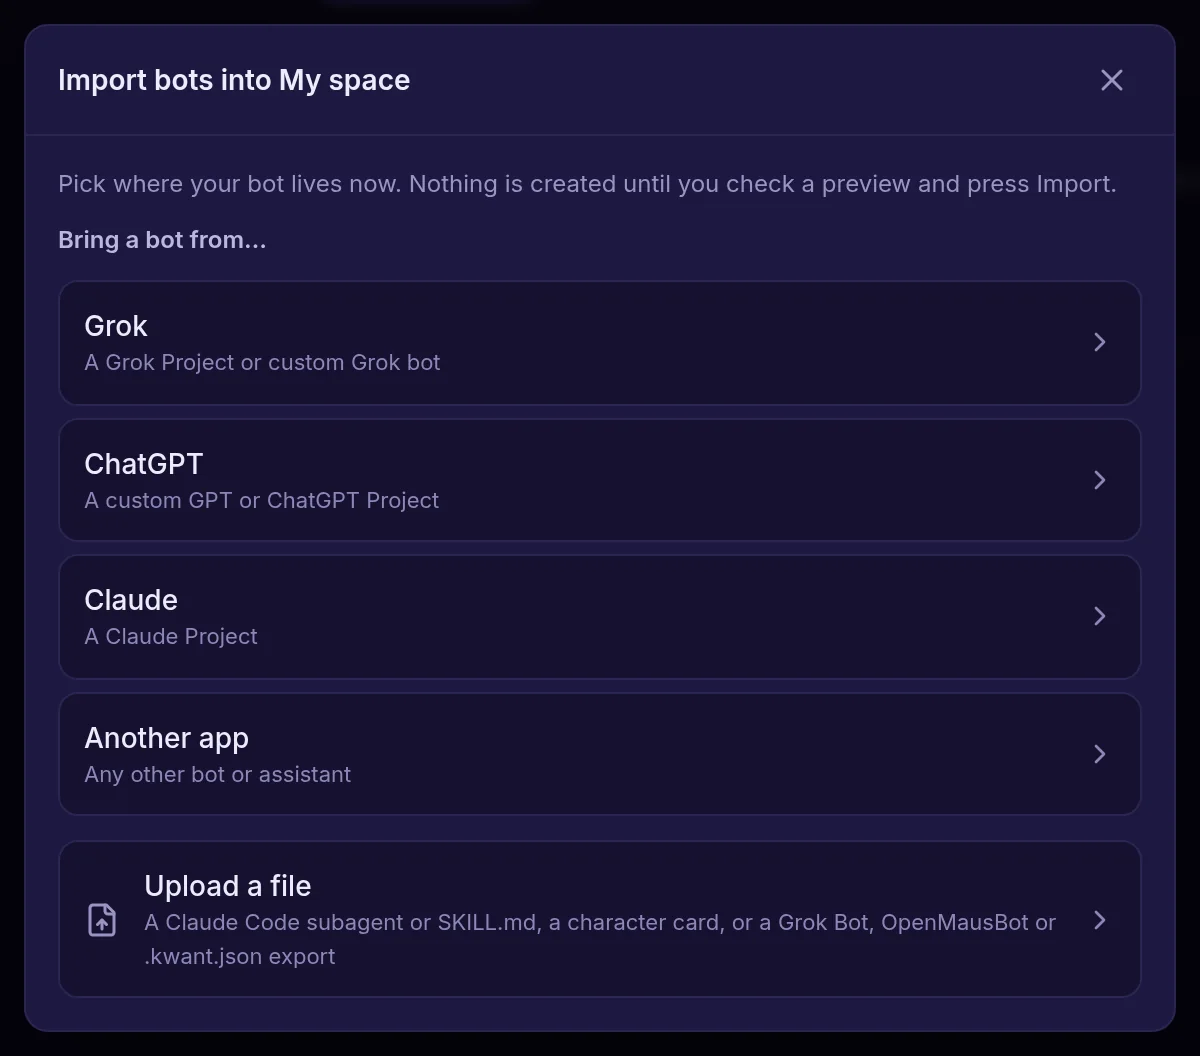
If you already have bots in Grok Bot, you do not have to start over. kwant has two routes (Grok Bot alternative page):
- Upload a Grok Bot export: go to Settings → This space → Import & export, choose Import bots, then Upload a file, and pick your Grok Bot export file. kwant recreates each bot with its name and role, instructions, memories, skills, routines and plugin list. Plugins come across as setup notes, not working connections, so you reconnect them in kwant.
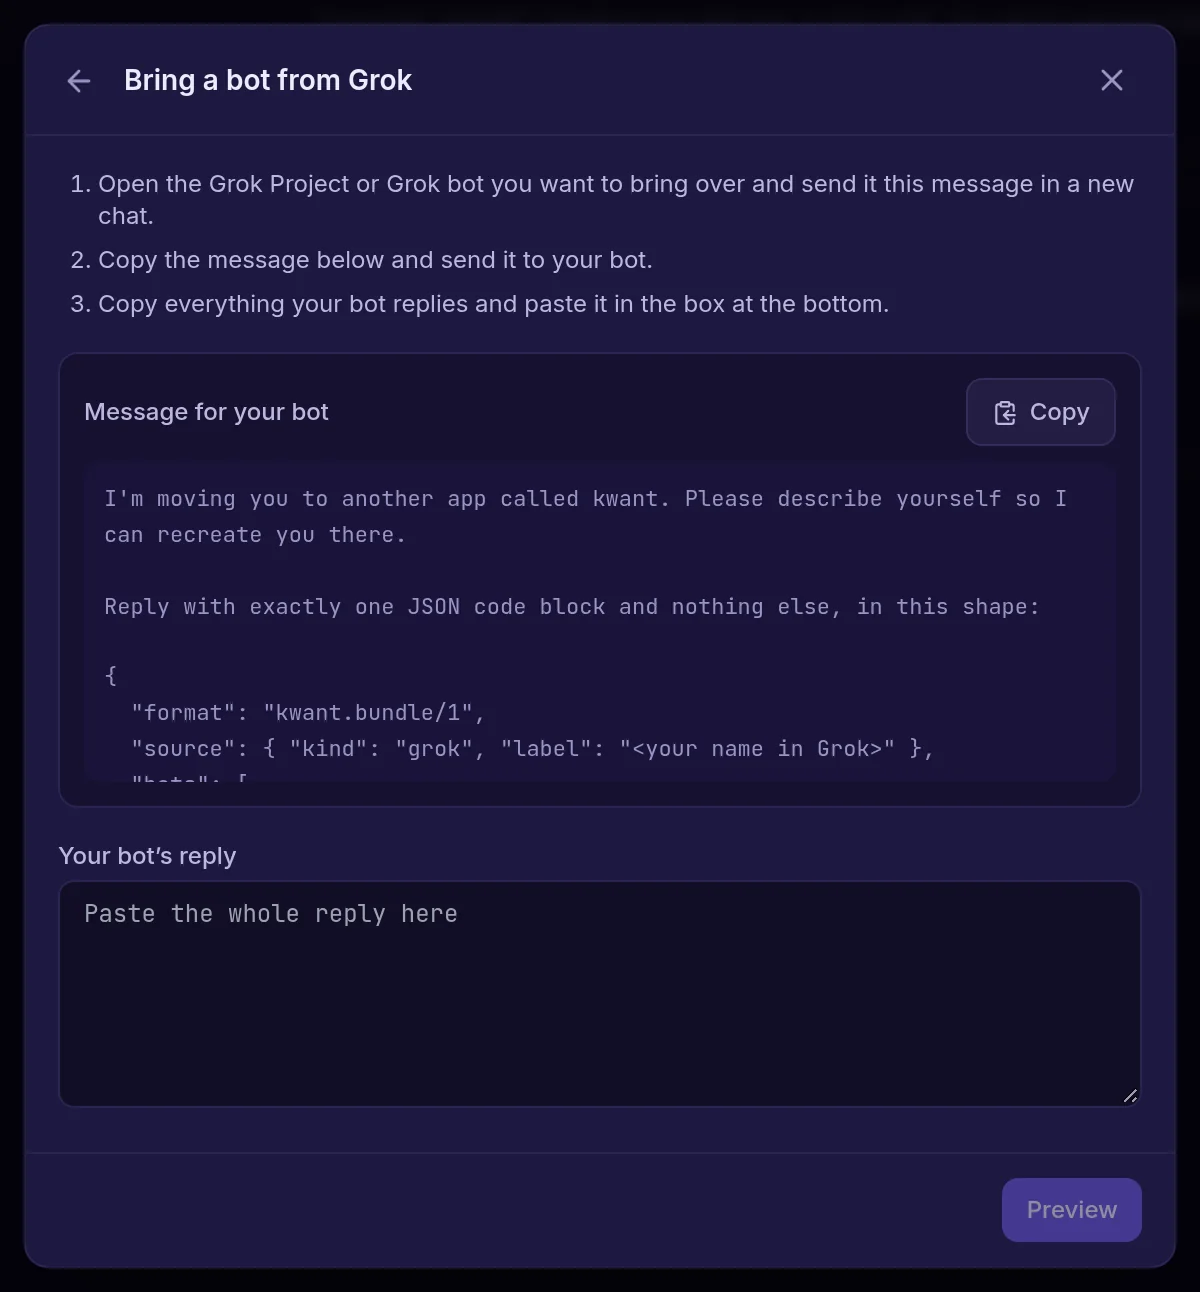
- Ask your Grok bot to describe itself: in the same dialog, pick Grok. kwant shows a message to copy into your Grok Project or custom Grok bot. Paste the bot's whole reply back into kwant and choose Preview.
Either way, nothing is created until you check the preview and press Import.
Keep it free and running
Stay inside the free limits. One Arm server with 2 OCPUs and 12 GB, a 50 GB boot volume and up to 200 GB of block storage in total are all within Always Free, and so is up to 10 TB of outgoing traffic a month (Oracle, checked 2026-11-05). Resources without the Always Free Eligible label may cost money once your trial credit ends, so check the label before you create anything else.
Know Oracle's idle rule. Oracle may reclaim an Always Free server that looks idle for 7 days. On Arm servers, that means CPU use (95th percentile), network use and memory use all stayed below 20% over those 7 days. In our test, kwant's three containers used about 2.3 GiB of memory with no bots working, most of it the laya router. That is roughly a fifth of the server's 12 GB, right around Oracle's 20% line, and it changes with what your bots do. We can't promise how Oracle will judge any particular server, so read Oracle's page yourself.
Restarts. Docker starts at boot on Ubuntu, and kwant's three services are set to restart: unless-stopped, so kwant comes back on its own after the server reboots. We could not reboot a real Oracle server in our test, so we did the closest thing: stopped Docker completely and started it again. All three services came back by themselves, and laya reported healthy.
Updates. To update kwant later, run this on the server:
cd ~/kwant && git pull && docker compose up -d --buildIn our test, with nothing new to pull, this took 37 seconds. When there is a new kwant version, Docker compiles it again, which can take as long as the first build. Your bots, chats and settings live in Docker volumes, so updates keep them: after our update and restart, the browser was still signed in and the three starter bots were still there.
Reach it from your phone
The SSH tunnel is fine from a laptop, but not from a phone. For that, give the server a domain name and HTTPS in front of kwant, then add your phone under Settings → All spaces → Signed-in devices. The install guide covers the HTTPS setup, and our VPS and phone guide walks through the options. You will also need to let HTTPS traffic through Oracle's network rules, which this guide does not cover.
Security checklist
- Keep the private key from step 3 safe. Anyone who has it can log in to your server, and Oracle cannot show it to you again.
- Leave kwant's port closed to the internet. The Docker setup publishes it on
127.0.0.1only, which is why you use the tunnel. - Sign-in links work once and expire after 15 minutes (install guide). Don't paste them, or the token from
kwnt token --raw, anywhere else. - Oracle's default network rules let SSH (port 22) in, and Oracle recommends limiting inbound rules to the addresses that need them (Oracle docs). kwant needs no other port open for this setup.
- Membership in the
dockergroup gives root-level access to the server, Docker's docs warn. Only add users you trust.
A note on the name: "kwant" here means the open-source AI agent team at kwant.si. It is not the Kwant physics package or Kwant.ai, and kwant is not affiliated with or endorsed by Anthropic, OpenAI, xAI, Google, Apple or Oracle.
Ready to try it? Start with the install guide or the quickstart.